... about now, for later

Category: EDCI 336 (Page 1 of 3)

This is a category for the EdTech course. Please add this category in addition to the relevant edtech assignment category(ies).

EdTech Inquiry: Tinkercad

Kids want to solve real world problems! Wouldn’t you also rather design a solution for a real problem rather than a project for the sake of an assignment?

Personalized Medallions 3D printed and a story, Alison Galloway, Ideas Lab, St. Michaels junior school

Kevin and I are wondering how to carry our cold drink cans with us hands free when we are cycling or camping. Well let’s take a look at the process of brainstorming to design to fabrication to presentation and how this could look in an elementary or middle school classroom.

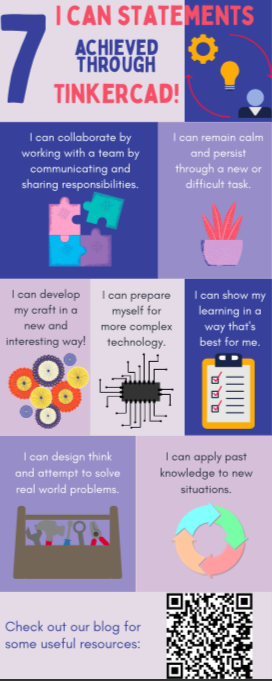
Under the “New” BC curriculum there is an emphasis on constructivism and inquiry-based learning, which begs to be supported by design and building such as that offered by Tinkercad. By encouraging cross-curricular learning in a Makerspace environment, kids can grow their core competencies of critical thinking, problem solving, collaborative learning, active listening, communication, & creative thinking, through project based inquiry.

Here is a suggested process of introducing Tinkercad to your classroom—adapted from Instructables.com. Check out my colleague Elizabeth’s post as well!

  • Get to know Tools yourself (Tinkercad, +/- Fusion 360, +/- 3D printer)
    • It will be easier to help students when they encounter difficulties if you know the program and have already worked them out.
  • Set up classroom for tinkercad 
    • computers, 3D software, internet, +/- mice
    • Other useful tools include Makerspace materials, such as clay, popsicle sticks, glue, toothpicks, pipe cleaners, string, recyclable products & blocks for prototyping designs and brainstorming.
  • Move from a 2D lens to a 3D lens when looking at your curriculum   
    • Look for opportunities to enhance learning by linking curriculum topics to core competencies and ASDT curriculum through cross-curricular projects with problem solving and design components.
    • Explore with students the tinkercad gallery or Thingiverse (sharing design files) to get started.
    • Watch videos of Tinkercad enthusiasts.
by Elizabeth Corry, with Canva
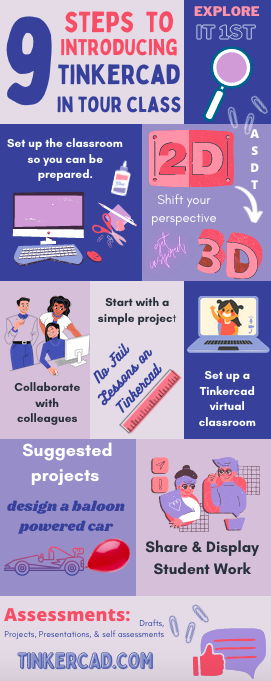
  • Collaborate with colleagues! 
    • If another educator has valuable experience in using Tinkercad, ask them to showcase their design knowledge once you’ve scaffolded the students with the necessary factual information. 
    • Use Makerspace time to expand cross-curricular projects and engage seamlessly with core-competencies. (see Alison Galloway St. Mike’s school)
  • Start with a simple project. Don’t overthink it!
    • Don’t write instructions, just co-create a rubric with students so they focus on their own creativity.
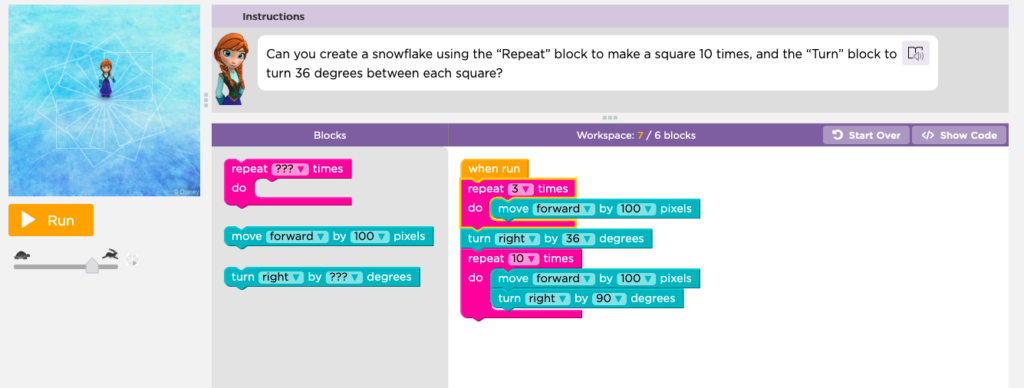
    • Tinkercad features step-by-step no fail lessons such as: make a ruler & make a clock.
    • If groups of students are designing their own board game then maybe only one student is working to make game pieces on Tinkercad (while others make the board, writing instructions, etc…)
  • Set up a Tinkercad virtual classroom—Tutorial.
    • Invite students to join
    • Assign projects
    • Collects work for evidence of learning
  • Suggestions for Tinkercad projects to get you started: 
    • Design your own game piece or key chain
    • Design a board game 
    • Design a maze
    • Map an ideal classroom
    • Recreate a lost family memento as a gift
    • Design and race balloon powered (vehicles?)
    • Solve real world problems (related to science, social studies, or your biggest pet peeve, etc…)
    • Check out the Tinkercad blog!

After tinkering is done, be sure to:

by Kevin Berna, with Canva
  • Share student work
    • Project presentations
    • Idea bulletin board with their designs, or 
    • 3D printing for displays
  • Assess
    • Self assessments at each stage
    • Drafts by stage (ideas, designs, prototypes, redesigns, final products)
    • Cumulative product or display for summative assessment with a brief reflection on the process, the challenges, and what lessons were learned

I tinkered with this little design. It was inspired by a carpenter friend who made a phone stand in his workshop out of off-cuts of wood. I imagine students making this follow a set of instruction I provide—maybe through my blog! If I notice a lot of my class has a personal device, I bet they would engage well with this task because it asks them to measure their device to put the stand together.

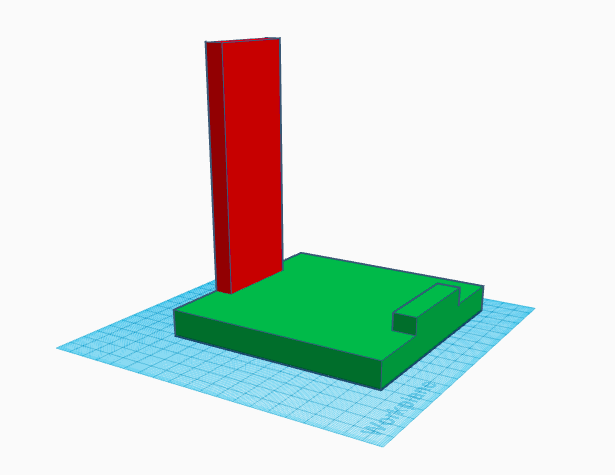
I can make this cross-curricular very easily. With the shapes still un-grouped—so they can see individual side measurements of all the shapes—they can make an accurate (labelled) sketch of all the dimensions. Then, they can imagine the bottom of their phone laying on the stand as the hypotenuse of a right angle triangle. I can ask that they verify a side length using the Pythagorean Theorum, and even calculate the area between the phone and the components of the stand using volume of a prism calculations. This is a useful activity because they have to subtract total width by the width of a smaller block to get a correct dimension, and then they can communicate how they came to a result, if it is accurate, and analyze sources of error and their strengths.

I hope this EdTech Inquiry proves helpful for other teachers learning how to integrate Tinkercad in their classroom! Take care.

Free Inquiry: Week 10

Thank you!

To Rich, our professor of Technology Innovation in Education. He has provided us valuable experience with digital tools and ethical debates about the implementation of tech in the classroom. As well, he has crafted this enjoyable project that spurred me to improve my practice of film photography, and make videos that could help others getting into film by making it a little less daunting.

And I cannot forget my readers! Your comments online and in-person spark fun conversations and help me stay motivated. Thank you.

Mystic Vale – concrete in nature

Growth

Through this inquiry, most immediately I’ve learned that a blog is a good way to display learning that involves multiple media. I made videos, wrote creatively, and posted some film photos all within WordPress . This project motivates me to craft projects and inquires in my teaching career that can be displayed through this personal shareable site.

More specifically about film photography, I first learned how the film speed displayed on the roll connects to my shutter speed and aperture. When setting up for shots, I think I was consistently setting my film speed as lower than what was actually in my camera. This can effect the image captured, and I’m very happy that I made a point of doing my second inquiry blog post on that function because it made most of my inquiry roll usable shots (34/36).

I learned how to use my self-timer! This isn’t super complicated but I had never tried it before, so this inquiry project evidently motivated me to try something new! I also used my tripod, which had previously collected dust in a closet before this adventure.

I also worked on my style as an artist. By committing to taking different types of shots in week 6, once the roll got developed, I had a variety of photos that act as tangible evidence of learning throughout the term. Making and following a plan and witnessing the results was an empowering as a photographer! I consider myself more than a novice now.

https://www.zippi.co.uk/thestudio/manual-photographers-cheat-sheet-infographic/

Finally, this inquiry has challenged me. Moving forward, I want to tailor the film I load into my camera to the situation that I plan on capturing. This is another level of planning, because I will not be able to remove roll once it’s loaded. I want to try shooting at night, therefore requiring a higher film speed with greater light capturing ability (see above). I have never done this and I am very curious to try and see the results. Maybe I’ll get an external flash and look the part.

As I stated in the above video I made, film photography isn’t completely new. Taking an academic approach to studying my process however, made it a completely different experience. I was shooting with a goal of making neat blog posts, not just catchy Instagram photos . . . I mean, I will post them on social media though, because I like likes. Follow me @kevychase_ on Instagram if you’ve enjoyed following my Free Inquiry!

Infused in this final post are a few more pictures I’ve taken in 2022 while I’ve been engaged with this project. I think the close up holly is a beautiful photo—the lighting and my focus setting was perfect to show the sharp edges of the leaves. I’m proud of that one, taken without a zoom lens. Also, the black and white photos taken at the Kinsol Trestle are beautiful. I had no specific plans, but I was pleasantly surprised to see how well the fog was captured on B & W film.

Week 10: Tech and Inquiry

Joanna Lake: Creating relationships with your class

Joanna Lake’s presentation was very polished. I enjoyed her tone throughout the presentation and her enthusiasm was contagious. Connecting to our principles of a good presentation that we discussed in Week 5, I think her visuals were on point. She transitioned to and from her videos fairly easily and those asides were helpful and supported her points, rather than distracting. One distraction: during question period, our presenter neglected to re-state the questions so that her answer was contextualized for our group that was attending over Zoom. Both classes asked good questions though, and I think Joanna’s attitude motivated us to inquire further.

Photo by Jade Seok on Unsplash

Some good takeaways: Feel Good Friday and Tea time to build crucial relationships with students. A teacher won’t be able to correct (gently) if you’re not connected, so get started right away in September. I’ve already thought of a game I want to play with practicum students, and I received some helpful writing instruction tips in the presentation as well.

Google Science Journal, in cooperation with Arduino technology (sensors)

This science tool is useful for a grade 7/8 science unit that I am in the midst of planning for my practicum. It can be downloaded to the iPads that I’ve seen the students use already in class and the students will have an easy time engaging with Arduino because it is very user friendly. I plan on using the tab that uses the technology inside handheld smart devices to measure the strength of magnetic current. This will be useful during my electricity unit, and maybe one day I could acquire the more sophisticated circuit boards to measure strength current. I think the main question I need answered before using it is: Are my students able to be responsible with expensive equipment while experimenting? I think digital science tools are really convenient, especially for a visible demonstration of an invisible (atomic) concept. See PHET Simulations to see what I mean.

FreshGrade seems like a tool that will become even more popular in years to come. I think the design of the app itself is a great idea because it brings something that is somewhat unknown to a parent (their kid’s day-to-day activities at school) to light by utilizing a smartphone, a tool with which a majority of parents are already familiar. I think for it to reach its highest level of utility, both parties need to be committed to posting and checking (respectively) the app on a consistent basis. Reference the app or posts in an all-parents emails to gently remind parents that this is a way they can connect with their child’s academics and keep track.

Week 9: Inquiry photo dumb

In this week’s penultimate Free Inquiry post, I will show off some photos that I took with that roll of film that I loaded (and unloaded). I will also connect some of my goals for composition—detailed in my Week 6 Inquiry post—to the photos below.

Self-timer

This was a good challenge. Here was my process for taking a self-timer shot. 1) Ask a friend to stand at the distance away from the camera that I would be standing for timed shot. 2) Focus my lens so that subject appear clear in viewfinder. 3) Mark that spot with a stick, ask friend to move, set timer on my film camera, and walk toward the stick and plan to reach that spot as the timer was going off/be ready for the flash (I took two timed shots, one walking away and one towards camera).

This (timed!) walking away photo that I find almost inspirational turned out quite well. It doesn’t differ drastically in terms of clarity to the feature photo in my Week 5 blog post taken from behind with my iPhone. Obviously it’s much brighter, but that’s Apple v. 1980s Nikon technology.

It was close because the exposure is right; I’m definitely letting the right amount of light into the camera and I am being hit by the sun’s rays, an ideal position for the subject. I would be able to be seen clearly if I had my focus right, adjusting the focus knob to match how far away I was standing from the lens.

Repetition and symmetry

One of my main goals stated at the end of my week 6 post was to use repetition and symmetry in photo composition.

I was wandering around campus and found this utility box. I found it difficult to get truly up close to a pattern that I found interesting and I realize that some of the examples I saw must have been taken with a zoom lens, which is more effective at filling the whole frame homogeneously.

This is a graffiti’d wall in Mystic Vale. I had to edit this photo; I must have taken it from the side not noticing, because it was off-centre post developing and therefore not truly centred to show symmetry. I edited it on my iPhone because I was having trouble doing it on my computer and I remember doing a simple edit for an Instagram photo to tilt it straight. It still looks like it was taken at an angle, but taking a symmetrical photo and editing are two skills I can use in the future.

Below, a neat depth of field photo of a cluster of trees at the edge of Ring Road. I have another like photo that I’m saving for next week too, stay tuned.

Lines

I like capturing cool lines and shadows in my film photography. Here are a couple from this Inquiry roll. Below, a fun brick wall depth shot with shadows crisscrossing. I think the last one one looks like it came from an admissions catalogue in the 80s when the Nikon EM was the best camera available.

Below: “The Clearihue Building, conveniently located across the way from the cafeteria, so you can fetch one last bite before locking yourself in a study room for the night.”

Thank you for following along for the last couple of months. I will be using this blog for fun in the future. As always, please share any thoughts about this post and other in the comments and I will have one last review of this inquiry to share next week!

Week 9: Multi-access learning and the flipped classroom

Before class

The pre-class activities were a good introduction to this mode of teaching and learning. I found the first-person account from the teacher employing a flipped classroom teaching model to be very revealing, in terms of the initial time (and possible financial) commitment. She says that her kids watch videos before the lesson and I think that’s really important because it allows students to come to class with some prior knowledge. The teacher can then more easily focus instructions for those who need the in-person support.

A simple video of building upon prior knowledge

Multi-access Learning

This class is well-constructed HyFlex learning. The flipped classroom is being implemented because we have pre-class activities that ‘steel’ us for the tasks of that day. As well, EdTech is flexible because we can follow down the outline for each week and engage in the class activities section if we are not physically present; the instructions are clear. Having done this, I think it is a good way to improve work habits and good habits of mind as learners.

None of these tech tasks have been particularly easy, but staying calm and following through brought learning that I used in that class and in the future. I persisted (#1 in the above image). Finally, we are always learning from our experiences (#16).

After the presentation by Ms. Nicole Kent and our class discussion, I think the main advantage is that it allows students the choice of modality. The new normal is likely going to make form of hybrid learning common in many schools, and this class is giving us opportunities to gradually gain more experience providing online learning options with screencasting and video making. Online learning can also involve the family in their kid’s education. I once heard a teacher say that a family asked them to send home homework or class activities because the student would be away for an extended period. This teacher didn’t believe in doing that, instead telling the family to enjoy their time and “just play some fun math games when you can”. I think having learning tools online can make this situation easier for parents because if they know what their kid is learning they can infuse casual conversation about the curriculum into daily home life.

One drawback is that students can become distracted when they are on the computer, therefore affecting their learning time. Also, it is a lot of work for teachers—everyone including professor and our presenter agreed on this during our class discussion. Practice makes perfect though, and we will never have online tools if we don’t start somewhere. And they be easily retrieved and used in future classes year after year.

My 3D shape created using the tutorial on UVic Creative Commons

Tinkercad

This was a great introduction class to Tinkercad, the topic of my future EdTech Inquiry with my friend Elizabeth. Tinkercad can be used in class to help students understand angles because designing object that requires multiple shapes likely requires some to be rotated. Tinkercad has a very clear wheel defining the angles so students can visualize the acute, obtuse, and reflex angles they are learning about in math.

A drawback, similar to last week’s discussion about coding, is that students can become frustrated. Creating something with multiple shapes also requires locking objects into place so that they aren’t misaligned with one wrong click of the mouse. But this is a good wrap up to this reflection because again it shows how online learning modes and digital tools require students to practice good habits of mind.

Week 8 Free Inquiry: Happy Accidents

I have many examples of photos that didn’t turn out when developed, and I will try my best to diagnose the cause. I remember being annoyed that some scenery shots were too dark or otherwise compromised, but I also have a few examples of photos that I love precisely because they have a mark that is unique to my camera. This resource helped my figure out what was wrong, and still helps me to this day.

I was in New York a couple of years ago and I felt like a true artiste toting around a film camera as I strolled through Manhatten and Brooklyn. Once I returned and had the film developed, I knew I had to 2) figure out my shutter speed and 2) repair my camera to stop light leaking in. Here are two photos show the issues.

Shutter speed too fast

So this was supposed be Central Park, but all you see are some tree tops. The black bar at the bottom is actually my shutter. I must have set the shutter speed too high and it was coming back to resting position before the film was fully exposed.

Light leak

Notice how on the foot of the photo on the right there is a faded beam of light extending from the edge of the frame. That is because light is leaking into the back of the camera. The next photo below is a hot mess of both of these malfunctions. However, since this is a mural of ODB’s Return to the 36 Chambers album cover in his hometown of Brooklyn, NY, and considering the raunchy style of the album, I think this is a great photo—10/10.

Flare

Lens flares are also a neat part of photography, not only film but digital as well. They occur when light is reflecting and refracting within the lens, usually because the photographer is pointed towards the sun and the light is a little too much for the camera to handle. I try my best now to shoot with my back to the sun; since I had the foam replaced in the film door of my camera to prevent light leaking in, more of my recent photos are mark-free. (See final photo at the end of this post).

Did not match film speed with scene brightness

The above recommended film speed for each condition is from a handy source that I used for my composition blog post as well. I took this picture (below right) in Mexico during a winter getaway (yas) and I realize now that 400ISO was not ideal because it was very bright and sunny; I think I overexposed many of my shots. The higher the film speed, the more light gathering ability the film has, so I should have been using a lower ISO (100-200, instead of 400).

It didn’t help here that I was shooting directly into the sun—I should have been setting my subjects so that the sun was shining on them, rather than on me—but I think I should have planned to bring a lower ISO to Mexico. I guess I’m just used to shooting the cloudy PNW. Although, a couple of photos did turn out amazing if I may say so (see one example below). And I think I know why. This one was shot at dusk with the sun providing the most indirect, natural light. The background is a nice contrast as well; I wonder if that makes a difference?

Scanning error?

This is a neat photo I took a while ago and it has a very unique mark that isn’t visible on any other photo I’ve taken. Down the right side of this photo appears to be a sort of fissure, almost like the film is splitting apart. I still have no idea what caused that, if anyone reading this has any ideas please leave a reply in the comments.

My camera is repaired and recent rolls have been free from light leaks. I enjoy snapping pictures in Victoria; I really like the colours of this Coastal First Nations art that is permanently displayed in front of the Royal BC Museum downtown.

Reflection: Week 8

Coding

I have begun to understand coding better as we move through this class. During EdCamp a couple of weeks ago, a friend in the other cohort lead an inquiry discussion (which ended up turning into the most helpful expert talk/demonstration) on Scratch. Check out their blog; they give a great breakdown of the research around CT (computational thinking).

There, I learned that CT is broadly about breaking tasks down into steps and it connects to algorithmic thinking and problem solving. Coding and CT-like activities are beneficial to elementary and middle years students because programs like the ones we used in class today (Scratch, mainly) are something they are familiar. Although the language used is semi-technical—the if, then, when type statements can be hard to organize—the process of moving a widget about a plane can be a way to support the habits of mind that we want to cultivate in students.

I got this far (task 6/12) on moving Anna & Elsa

A teacher can justify engaging in coding and computational thinking activities because they supplement the creative and critical thinking work that comes in the form of inquiry projects and group work. The purpose is not for coding to replace these rich tasks, but rather to add another element to their school work; coding requires a different type of thinking and most importantly a lot of patience, which might be why I only reached level 6/12 in our in-class activity.

As a component of critical analysis for this blog post, it is worth noting that a possible drawback is that some students could be completely uninterested in this type of work, or become too frustrated that the task has little benefit. A lot of students like video games, but they might have trouble finding the utility in making a character move when they to give it directions. If someone reading this hasn’t seen this video of the persistence required to make a peanut butter and jelly sandwich, give it a watch because it is an apt visual of what could happen if a a child becomes frustrated (the ones in the video didn’t, but the activity was fun and they were being filmed).

Photo by Christopher Burns on Unsplash

Coding and math

The Anna & Elsa game can be a good way to visualize degrees. I had trouble turning right in the game, so I began telling my character to turn more than 270 degrees to the left in order for them to end up in the direction I wanted them to go. I understand degrees well, but I imagine this is a good activity to show the relationship between acute, obtuse, straight, and relfex angles in a 360 degree circle. Some Scratch games specifically use an x – y axis and ask a character to move using negative and positive values. I think these could be cool culminating activities.

If you are reading this and have other coding and math connections, please drop a comment! Thanks for reading!

Week 7 Reflection: Accessibility

Accessible photos

A decorative image of three ladies relaxing on a beach after floating in their inner tubes.

Reflection prompts responses

Previous to this degree, as a high school and undergraduate student who benefited from increased ability in the academic context, the extent to which I understood digital accessibility was including subtitles in a movie to give more people the opportunity to experience the media no matter their different abilities.

I found one cite that has examples of multimedia learning objects—click here to see an example of an interactive story map that guides the user through history. I think the accessibility component of text is being addressed here because the headings are clearly defined by movement across a map, helping the user make chronological sense of a lot of information. I think this tool is helpful when the topic doesn’t require a lot of words to transmit the information. I don’t think it is particularly visually accessible, and I welcome comments and links to examples of more visually accessible information sharing because I think it is something that is often not accounted for by myself and others.

https://openclipart.org/image/400px/304157
OpenClipArt

I was surprised to learn that making a media accessible includes using the right colours to improve contrast for everyone’s viewing. I enjoyed my learning pod’s exploration of the web accessibility evaluation tool and I will use that in the future to consider students’ learning needs.

I think the fact that students with different abilities are often designated education assistants is a reason why accessibility practices are not used often enough. It is on my agenda to keep these in mind for my teaching in the future.

Accessible video

I believe the subtitles should be in this video I created for my inquiry blog post—click the CC button underneath the time bar to show the text. Tanks for reading!

Week 7: Unloading film

I tried a new set-up for my point of view style filming. I found it much more comfortable to see what I was doing while making sure it was all visible on video—I hope you enjoy it! Also, sure, it’s lots of me talking; however, I am very proud that I successfully added a cute lil’ audio clip to the title sequence! I think in all, I can say that I’m becoming more confident composing video tutorials.

I have just made a video about how to take film out of the camera. The process of developing film is arduous to say the least. ‘Developing’ in the context of photography means chemically treating exposed film (film that has been exposed to light via the opening of a camera shutter) to make the pictures imprinted on the material visible, while avoiding over exposure. Here is an expansive article on the subject, as well as a Youtube video that shows the amount of materials and steps needed.

I know what you’re thinking, wow, these folks are passionate! Truth be told, I don’t believe I will ever do this myself. But it’s interesting to learn about. There’s a hashtag that I’ve seen used on Instagram before—#shootfilmstaybroke. Tally up the cost of the film itself (before shooting), and the labour cost associated with having someone develop your film, scan the negatives to convert them into a digital file, and upload them to a file sharing space, and you’ve got yourself a nice (solo) dinner out and a good tip for the staff.

One thing I might invest in is a scanner for the negatives—what the film is called after being developed. That way I can accumulate a bunch of roles with pictures that aren’t required urgently for a blog post, still bring them to a third party to be developed all at once, but then take my time scanning the negatives. I’m really enjoying another project I’m doing with my hands that I’ve posted on Twitter, so I can see myself scanning my own photos too.

I’ve rambled on enough. Next week I’ll post about what I referenced in my video, how light leaks and scanning errors can affect the final product.

Free inquiry wk 6: Shot composition

Hello readers! I am still going through the 36-shot rolls of film. Sometimes it is hard to find time to shoot because carrying a film camera around isn’t always easy. I definitely don’t take it out if it’s raining because film cameras—or any camera, probably—do not like water! Sometimes I just have a bag or some other personal object in my hand, so stopping to put my things down while I take a photo kind of makes it a chore. And, finally, doesn’t everyone wish they had all the time in the world to engage with a fun hobby?

Photo by Ben White on Unsplash

As I continue to shoot, I will try use this resource to compose my photos. Doing this will ensure that I have good variety and will help make the most of every roll. I find that as I look through my collection of past photos, I like capturing landscapes rather than an isolated subject. I think I have a good concept of the framing my shots, and I can reference a picture in my archives.

Here I am in False Creek looking towards the Granville St. Bridge in my hometown of Vancouver. Like the article suggests for framing, I think I did well here to capture objects outside the water and frame the centre of the scene, so that the viewer’s eye is drawn to the bridge as the focal point.

I think this is a good example of using the rule of thirds, which is the primary tip in the article. This rule states that a photographer should position the important elements of the shot along the lines dividing the scene in thirds (see image in article for visual of this). I love the way the clouds appear in my photo above. They define the top third of the image, leaving the outcropping of rocks to define the middle, and the waves the bottom third. Then my eye is drawn to the driftwood and the ship in between and around these natural divisions.

Another resource I found advocates for a diversity of shots. See the ‘Step 3: Take your shot!’ in this article to see what I mean. In my coming roll I want to try an example of repetition, where the whole frame is filled with a pattern. I’ve never thought to get up close and personal with a cool pattern or texture, so I’m curious to see if I can capture that well. Comment if you know some good locations in Victoria to capture and I’ll see if I can make it happen!

« Older posts